A VPS (Virtual Private Server) is powerful because it gives you freedom. You can run apps, host websites, or even set up development environments. But what happens when the operating system isn’t the one you need? Maybe your VPS came with CentOS, but you prefer Ubuntu. Or perhaps your business software only works on Windows Server.
The good news is simple, you don’t have to stay stuck. On CloudPap, you can change your VPS OS in a few clicks. This guide walks you through why it matters, what to do before switching, and the exact steps to follow.
Why You Might Need to Change Your VPS OS
The operating system is the foundation of your server. It determines what software runs smoothly, how you manage security, and how you interact with your server. Choosing the right one makes life easier. Here are some reasons you may want to switch:
- Familiarity: You work faster when you are using an OS you know well. Maybe you are comfortable with Linux but ended up with Windows by mistake. Working with an OS you know well saves time and avoids frustration.
- Application compatibility: Some apps are built to run best on specific systems. For example, many PHP frameworks work flawlessly on Ubuntu. Certain enterprise tools need Windows Server.
- Performance and security: A lightweight system such as Debian can free up resources for your applications. Updating to a modern OS patches vulnerabilities and boosts stability.
- Experimentation: Developers often want to test new environments. With a VPS, you can change your VPS OS, explore, and revert when needed.
In short, the OS sets the tone for how your VPS performs. Getting it right ensures your projects run smoothly.
Backup Before Anything Else
Before you change your VPS OS, know this, the process wipes your entire server. Everything is erased. Files, databases, and configurations.
That is why backups are critical. Take a few minutes to secure your data.before touching any OS settings:
- Copy important files to an external drive, another VPS, or cloud storage.
- Save your databases separately. Export them and confirm the files open correctly.
- Store configurations such as firewall rules or cron jobs in a safe place.
- Double-check that backups work before moving forward.
Step-by-Step: How to Change Your VPS OS on CloudPap
Once your data is safe, the actual process is simple. CloudPap makes it easy to reinstall or switch operating systems without needing support tickets or extra fees.
Here is how to do it step by step:
1) Log in to Your CloudPap Dashboard
Head to the CloudPap. Open your CloudPap dashboard. Remember to use the email tied to your services.
2) Open the target VPS
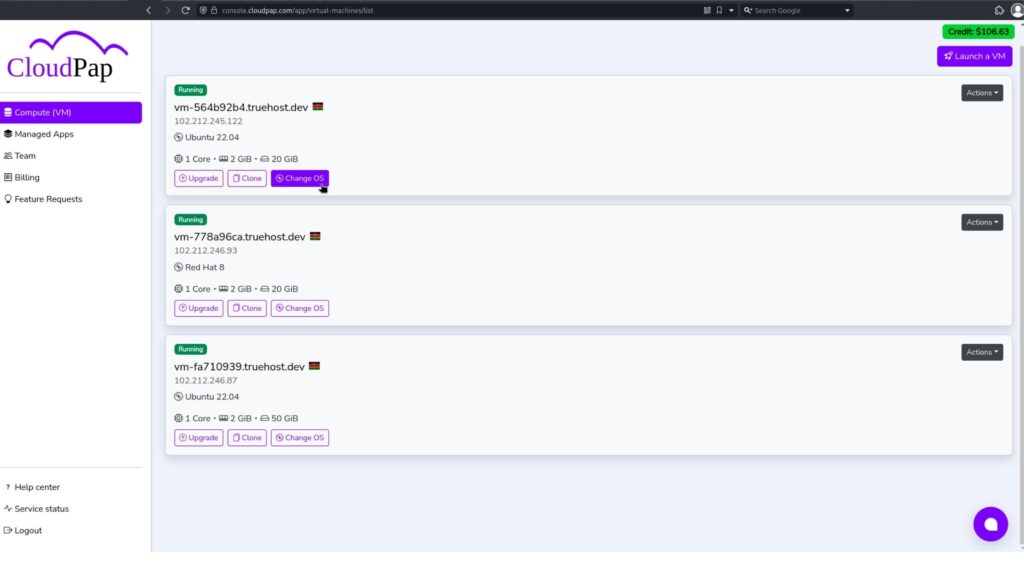
Go to My Services. Click the VPS you want to rebuild. You will land on the manage page with power, console, networking, and rebuild tools.
3) Confirm you have backups
Pause here. Verify you saved files, databases, and configs elsewhere. Test at least one backup. If something feels uncertain, stop and export again.
4) Click “Change OS”
Find the Change OS or Reinstall option in the manage panel. This starts a clean rebuild.
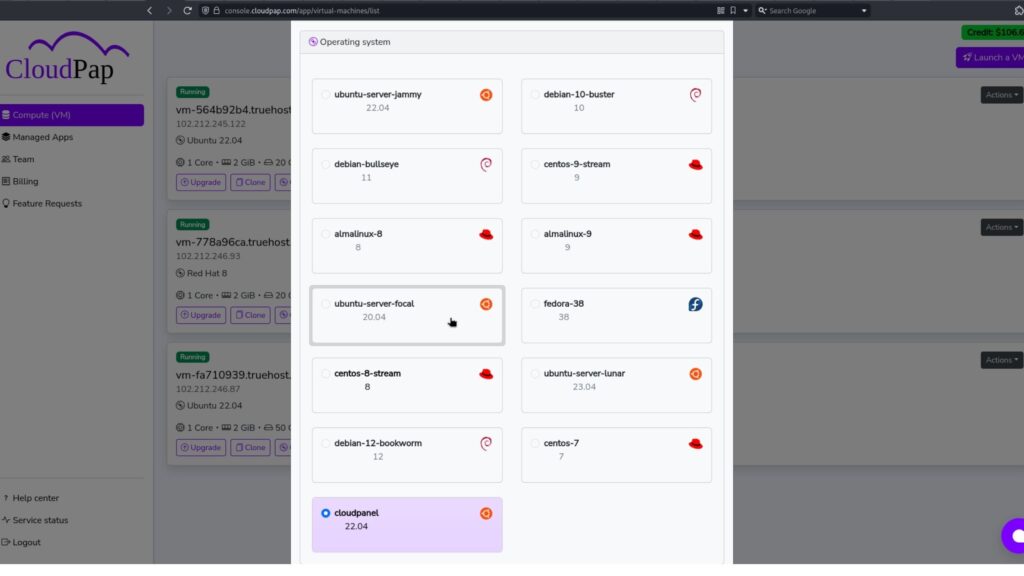
5) Choose the new image
Choose your new operating system. At CloudPap we offer you some popular options like:
- Ubuntu for web apps, great docs, wide package support.
- Debian for stability with low overhead.
- AlmaLinux/CentOS for enterprise stacks.
- Windows Server for .NET, MSSQL, or Remote Desktop workflows.
Select the version you actually need. Match it with your app requirements.
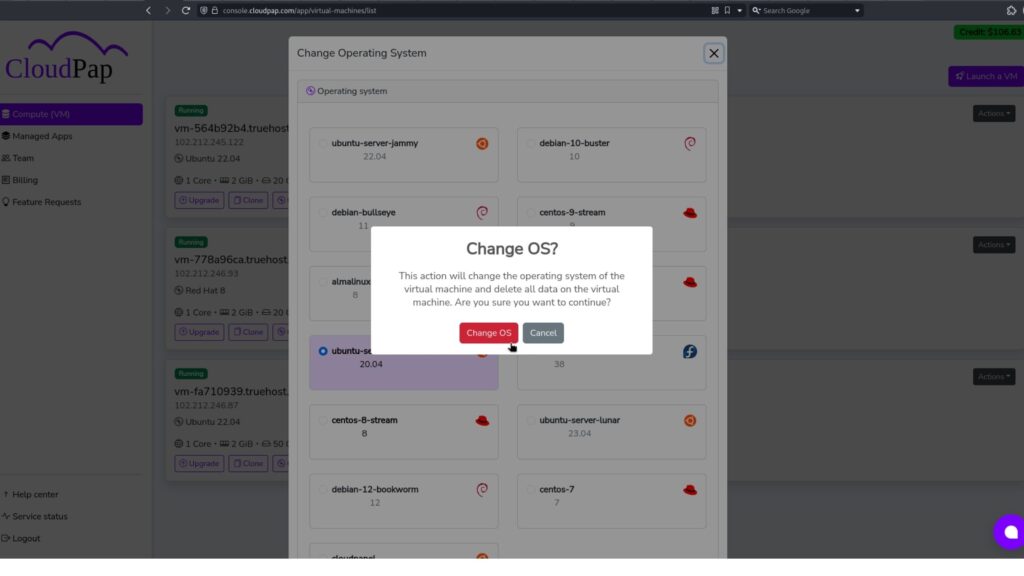
6) Acknowledge data wipe
A reminder will appear that all data will be erased. Since you already backed up, you are good to proceed.
7) Start the rebuild
Click Confirm. The panel shows progress. Most installs finish in about 10-15 minutes. Do not power cycle during this phase.
8) Grab new credentials
When the rebuild completes, CloudPap emails fresh access details. For Linux, use SSH with the new root password or your key. For Windows, connect through RDP with the Administrator password. Log in once, then change those passwords.
9) Secure and update
Run updates right away:
- Ubuntu/Debian: apt update && apt upgrade -y
- AlmaLinux: dnf update -y
Create a non-root user. Add SSH keys. Enable a firewall (UFW, firewalld). Set timezone, hostname, and swap if needed.
10) Restore and test
Reinstall your stack (Nginx/Apache, PHP, Node, Python, MySQL/PostgreSQL). Import databases. Sync files via SFTP or rsync. Recreate .env secrets. Update DNS or reverse DNS if required. Restart services. Verify sites, APIs, cron jobs, email, and backups.
Tips for Choosing the Right OS
Choosing an operating system for your VPS often feels like standing in front of a huge menu. Every option looks tempting, but the choice you make will determine how smooth your experience is. Let me break it down in simple terms.
- Ubuntu: This is the friendliest option for most people. It has a clean design, strong community support, and plenty of tutorials online. If you ever run into an issue, chances are someone has already faced it and written about the solution. For developers building web apps or running servers, Ubuntu delivers a nice balance of simplicity and reliability.
- CentOS / AlmaLinux: These are the steady, no-nonsense choices. Businesses love them because they rarely break and are built for stability. If you want your VPS to run without surprises for a long time, this is the way to go. Enterprise users often pick CentOS or AlmaLinux for hosting client data, eCommerce sites, or big projects that cannot afford downtime.
- Debian: If efficiency is your top priority, Debian should be on your radar. It strips away unnecessary extras and focuses on speed, security, and consistency. This makes it great for VPS plans with fewer resources. It is often the choice for developers who prefer lean, fast systems where they control everything.
- Windows Server: Sometimes Linux just doesn’t fit your needs. If your work revolves around .NET applications, Remote Desktop setups, or Microsoft SQL databases, Windows Server is the natural option. It feels familiar to anyone who has spent time on Windows desktops and integrates perfectly with Microsoft tools.
Still unsure which system works best for you? Contact our support team for extra help.
Common Mistakes to Avoid When You Change Your VPS OS
Changing your VPS operating system can be exciting, but mistakes during the process can turn that excitement into regret. Here are the pitfalls you will want to avoid.
- Skipping backups: This is the number one mistake. Once you reinstall a new operating system, your old files are gone forever. Without a proper backup, there is no way to recover them. Always double-check that your backup works before starting.
- Choosing the wrong OS: Not every system runs on every operating system. Before installing, verify that the apps, frameworks, and databases you rely on will run smoothly on the new setup. Otherwise, you may find yourself doing another reinstall just to fix compatibility issues.
- Forgetting reconfiguration: A new OS is a clean slate. That means firewalls, security rules, and software all need to be set up again. Many people overlook this step and end up with unprotected servers or missing tools.
- Ignoring documentation: Every OS has unique traits, from different commands to specific update methods. Documentation exists for a reason. Skipping it often leads to wasted hours solving problems that could have been avoided.
Avoiding these mistakes saves time, protects your data, and makes the transition much smoother.
When to Change Your VPS OS
Knowing how to change your VPS OS is useful, but knowing the right moment to act is even more important. Switching too often creates extra work, while waiting too long can limit your projects. Here are the times when it makes sense.
- You have outgrown your current setup. Starting with Ubuntu may have been perfect, but now you need Windows Server for enterprise apps or client projects.
- Security updates have ended for your current version. Using an outdated OS puts your VPS at risk, and upgrading keeps it safe.
- Applications demand more. Some frameworks or APIs only work properly on specific distributions. If your OS cannot support them, switching is unavoidable.
- Performance feels limited. Lightweight distributions such as Debian can make a noticeable difference in speed if your current system feels sluggish.
- You want to test. Developers often need a sandbox to experiment before going live. Changing your VPS OS gives you that flexibility.
After You Change Your VPS OS
Reinstalling the OS is only half the job. Once the change is done, your VPS needs preparation before it can handle production tasks again.
- Reinstall all essential software and services. This includes web servers, databases, or development tools.
- Restore your backups. Databases, files, and configurations should be brought back carefully, with checks to confirm they work as expected.
- Run updates right away. A fresh OS install is never fully up to date. Applying patches immediately strengthens security.
- Secure the environment. Re-enable firewalls, set up SSH keys, adjust permissions, and close unnecessary ports.
- Monitor closely. Keep an eye on performance, error logs, and uptime for the first several days. Early monitoring catches issues before they escalate.
Doing these steps ensures your new OS runs smoothly and securely.
Final Thoughts
The operating system is the backbone of your VPS. Choosing the right one can make your work faster, smoother, and more secure. On CloudPap, you can change your VPS OS in just a few clicks.
Back up your data. Pick the right system. Confirm the switch. Then enjoy a clean, fresh environment tailored to your needs.
👉 Already hosting with CloudPap? Take advantage of the flexibility. Change your VPS OS today and run your server on the foundation that works best for you.

